How to Use and Manage Receipts in QuickBooks Online
Stop chasing paper receipts. Here is the complete, step-by-step workflow to keep your books clean, audit-ready, and stress-free all year long.
QUICK SUMMARY: This guide explains how to capture, attach, and manage receipts in QuickBooks Online. It covers three ways to get receipts into QuickBooks; the mobile app camera, desktop file upload, and team email forwarding. Followed by how to review, categorize, and save each receipt correctly. The guide also covers attaching receipt images directly to transactions for audit purposes. Who is it for? Small business owners, bookkeepers, and office managers who use QuickBooks Online and want a cleaner, more organized system for tracking business expenses.
Why Receipt Management Matters for Your Business
We hear it all the time at Certum Solutions, clients come to us with multiple binders (or multiple shoe boxes) full of receipts they have been meaning to sort through for months. Sound familiar? Disorganized receipts create real risks for your business; missed deductions, reconciliation headaches, and a stressful scenario if you are ever audited.
QuickBooks Online has a built-in receipts feature designed to eliminate that paper chaos entirely. Whether a receipt comes from your smartphone camera, a file on your computer, a Google Drive folder, or a team member's email, QuickBooks can capture it, read it, and help you categorize it; all in one place.
Note: The IRS requires that all business expense deductions be documented with receipts or other proof, although very small or “de minimis” expenses may have some flexibility. Keeping a consistent receipt workflow ensures your deductions are valid and audit-ready.
This guide walks you through the full workflow, from snapping a photo on your phone to reviewing and saving a transaction on your desktop. Follow along with our video tutorial above or use this post as your own standalone reference any time you need it.
Pro Tip from Certum Solutions: Adopting a receipt workflow early, even when you only have a handful of expenses, will save you enormous time and stress as your business grows. The best time to start is today.
Need help setting up your receipt workflow from scratch? Certum Solutions offers free consultations and can help with all your QuickBooks needs.
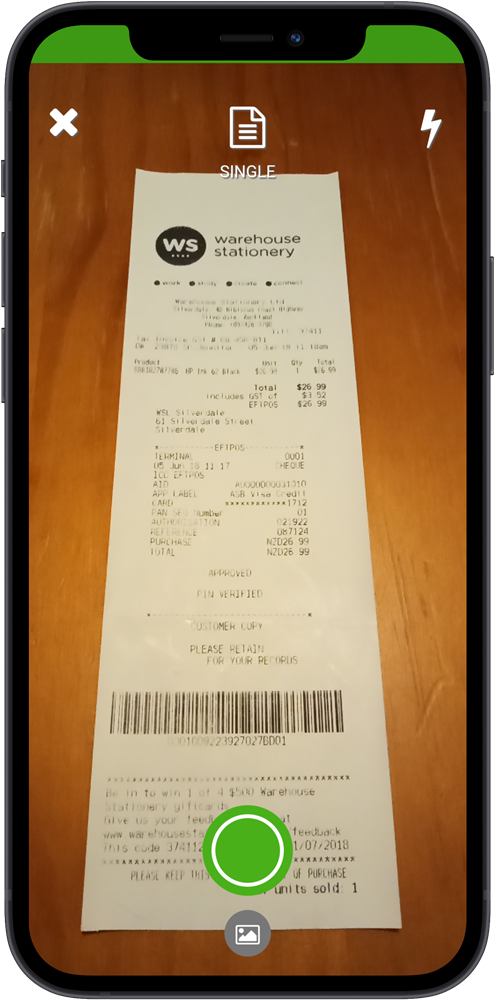
QBO mobile app camera capturing a paper receipt
Capturing Receipts with the QuickBooks Mobile App
The QuickBooks Online mobile app makes it possible to capture a receipt the moment a purchase happens, no more digging through your bag at the end of the month.
Step 1: Download & Sign In
The QuickBooks Online mobile app is available for both iOS (App Store) and Android (Google Play). Download the app for your device, open it, and sign in with the same credentials you use on the web.
Step 2: Open the Receipt Camera
From the main screen of the app, locate the small round button in the bottom right corner of the screen. Tap it to bring up the receipt camera.
Step 3: Snap the Receipt
Flatten your receipt: Lay it as flat as possible so all text is clearly visible. Crumpled or folded receipts are harder for QuickBooks to read accurately.
Frame all four corners: Make sure every corner and edge of the receipt is inside the camera frame. Nothing should be cut off.
Wait for the green indicator: The camera frame turns green when QuickBooks detects the receipt is properly positioned. Hold steady to avoid blur, then tap capture.
Review and confirm: After snapping, you can crop the image, delete a blurry shot, or capture additional photos. When satisfied, tap Use This Photo.
Important: Only photograph one receipt per photo. If a purchase comes with multiple receipts, photograph each one separately. Multiple receipts in a single image can confuse QuickBooks and cause processing errors.
Step 4: Wait for Processing
A brief message will confirm that your photo is being processed. Once complete, your receipt will appear in the For Review tab inside the app.
Uploading Receipts on Desktop (QuickBooks Online)
Not every receipt arrives on paper. Online orders, subscription renewals, and vendor invoices often land in your inbox as PDFs or images. QuickBooks Online makes it easy to upload these directly from your computer.
Navigating to the Receipts Section
In QuickBooks Online, click All Apps in the left navigation, then Accounting, then Receipts. If you are using an older version of QuickBooks, the navigation may look slightly different, but the Receipts feature works the same way.
Uploading a File
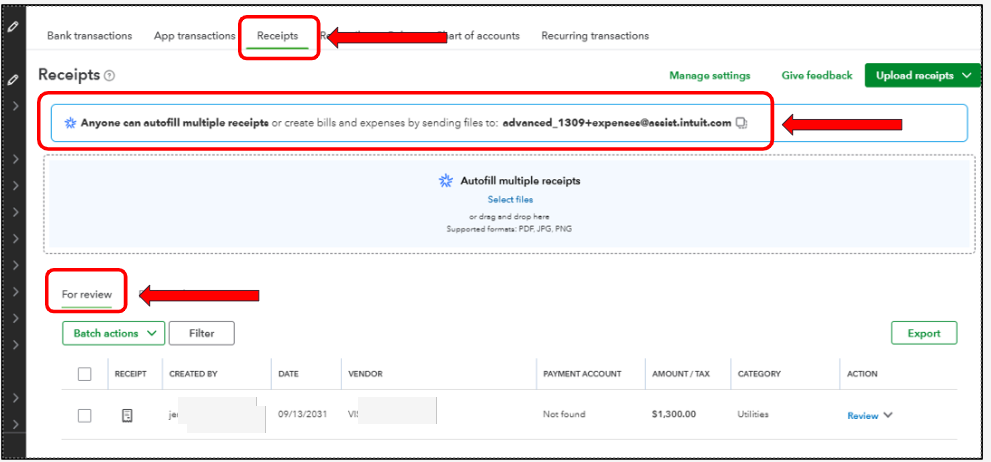
In the top right of the Receipts screen, click Upload Receipts. You can upload from your computer directly or pull a file from Google Drive. You can also drag and drop files onto the upload area.
Supported File Types: QuickBooks Online accepts JPG, PNG, and PDF files. Always ensure that each file contains only one receipt. Each file you upload becomes one new receipt record in QuickBooks.
You can upload multiple files in a single session. Once uploaded, QuickBooks processes each receipt and they appear in the For Review tab, just like receipts captured via the mobile app.
How to Review & Categorize Receipts
Whether a receipt came in through the mobile app, a desktop upload, or a forwarded email, the review process is the same. This is where you tell QuickBooks what the expense was, who you paid, and where it should be recorded in your books.
Opening a Receipt for Review
In the Receipts section, click the For Review tab. Click Review next to the receipt you want to process.
Fields to Review and Complete
QuickBooks will try to auto-fill several fields using OCR from your receipt image. Always verify these before saving:
Transaction Type: Should be "Expense" for most business purchases
Payee: Who you paid; select an existing vendor or add a new one
Payment Account: Which bank account or credit card was used
Payment Date: Auto-filled from the receipt; verify it matches your actual receipt
Payment Method: Cash, check, credit card, etc.
Amount: Compare it to the total on your receipt and correct if needed
Category: Choose the correct expense category (e.g., Supplies, Travel)
Billable / Taxable: Check these if the expense is billable to a client or tax-applicable
Customer: Assign to a client if the expense is billable
Reference Number: Optional; useful for matching to a PO or vendor invoice
Description / Memo: Short note about the purchase (e.g., "2025-02-14 - Home Depot - Screws for Job Site")
Tip on Payees: If you have paid a vendor before, QuickBooks may offer to prefill expense details based on past transactions. This can save time; but always review auto-filled data carefully, especially if categories vary between purchases.
Splits
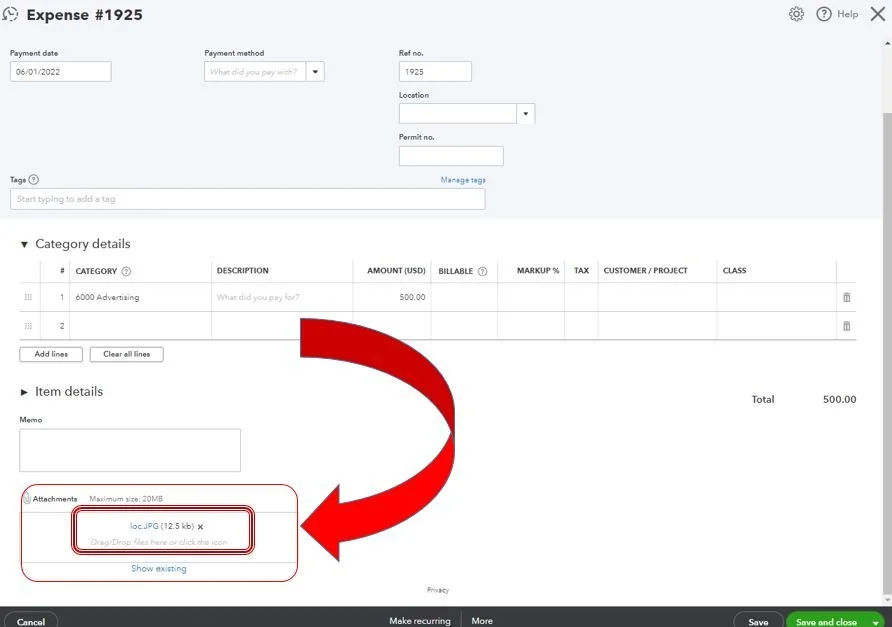
If a single receipt covers items in multiple expense categories, click Add Split to allocate portions of the total to different accounts. This is especially useful for hardware store receipts or mixed-use purchases.
Saving the Receipt
When everything looks correct, click Save and Close. The receipt moves from the For Review tab to the Reviewed tab. If you spot an error later, you can return to Reviewed and undo the transaction to make corrections.
Feeling overwhelmed by your books? We help small businesses set up clean QuickBooks workflows, automate uploads, and stay audit-ready, without the headaches. Our initial consultations are 100% free.
Attaching Receipt Images to Transactions
One of the most important habits you can build in QuickBooks Online is attaching the original receipt image directly to every transaction. If you are ever audited, your auditor will want to see source documents. Having the receipt attached directly inside QuickBooks gives you an ironclad audit trail, no scrambling through filing cabinets or old email threads.
How to Add an Attachment
When you are in the receipt review screen, scroll to the bottom to find the Attachments section. Click Add Attachments and select the receipt file from your computer.
Certum Solutions Strongly Recommends: Make attaching the receipt image a non-negotiable step in your bookkeeping workflow. It takes a few extra seconds per transaction but saves enormous time and stress in the event of an audit or any question about a past expense.
Setting Up a Custom Email for Receipt Forwarding
QBO receipts settings screen showing the custom email address field
If you have a team, or even just a few people who make purchases on behalf of the business, manually collecting paper receipts from everyone is a recipe for chaos. QuickBooks Online lets you set up a custom email address that automatically routes incoming receipts into your “For Review” tab.
How to Set It Up
Go to All Apps > Accounting > Receipts in QuickBooks Online.
Find the custom email option in the upper area of the Receipts screen.
Set your access permissions; allow anyone with the address to submit or restrict it to specific registered users.
Copy the email address and share it with your team. Any receipt they email to that address will appear automatically in your For Review tab.
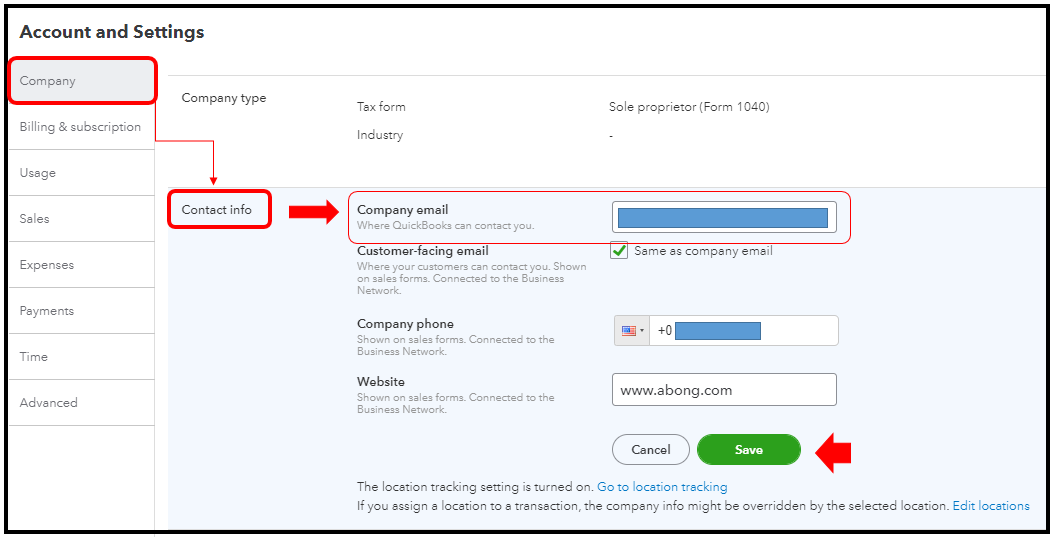
Note: You can edit your custom email address at any time, for example if your company name changes. All previously submitted receipts are retained and unaffected.
Quick Reference: Receipt Upload Methods in QuickBooks Online
| Method | Best For | How to Access |
|---|---|---|
| Mobile App Camera | Paper receipts at point of purchase | Tap round button (bottom right) in the QBO app |
| Desktop File Upload | Downloaded PDFs, email receipts saved to computer |
All Apps > Accounting > Receipts > Upload Receipts |
| Google Drive Upload | Receipts stored in Google Drive | All Apps > Accounting > Receipts > Upload from Google Drive |
| Custom Email Forwarding | Team members forwarding digital receipts | Set up in Receipts section, share address with team |
Frequently Asked Questions
Can I use the QuickBooks receipt feature on Android as well as iPhone?
Yes. The QuickBooks Online mobile app is available for both iOS (App Store) and Android (Google Play). Simply download it for your device, sign in with your QuickBooks credentials, and you are ready to start capturing receipts right away.
What file types can I upload as receipts in QuickBooks Online?
QuickBooks Online supports JPG, PNG, GIF, and PDF files. Each file you upload should contain only one receipt to ensure accurate processing. If a document has multiple transactions, split it into separate files before uploading.
Can multiple team members submit receipts to QuickBooks Online?
Yes. By setting up a custom email address inside the Receipts section, your entire team can submit receipts simply by emailing them to that address. They will show up automatically in your For Review tab. You can restrict access to specific registered users if needed.
What happens after I review a receipt in QuickBooks Online?
After you categorize, verify the details, and save a receipt, it moves from the For Review tab to the Reviewed tab and is recorded in your books. If you make a mistake, you can return to the Reviewed tab and undo the transaction to edit it.
Should I attach the original receipt image to the transaction in QuickBooks?
Yes, and Certum Solutions strongly recommends it. Attaching the receipt image creates a complete audit trail. If you are ever audited or need to look back at an old expense, you can see the original receipt right inside QuickBooks without searching through physical files or old emails.
Can QuickBooks Online auto-fill receipt details from a photo?
Yes. QuickBooks uses OCR to extract information from your receipt photo or uploaded file; including the payment date, total amount, and merchant name. It will try to match these to your existing accounts and vendors. Always review auto-filled fields before saving.
Does QuickBooks Online support split expenses for a single receipt?
Yes. When reviewing a receipt, click Add Split to divide the total across multiple expense categories. This is useful when a single purchase includes items for different accounts; for example, a hardware store receipt covering both office supplies and job site materials.
I have years of backlogged paper receipts. Where do I start?
That is exactly the situation we help businesses with at Certum Solutions. We recommend starting with the current month to build the habit, then working backward through backlogged receipts in batches. Our team can help you set up an efficient catch-up workflow and train your staff. Book a free consultation to talk about your specific situation.
Get Started Today
Ready to take control of your books? Once you start capturing receipts the right way in QuickBooks, it feels like you finally have control. Let Certum Solutions help you build a system that works, for receipts and everything else in your bookkeeping. Get your free consultation at https://www.certumsolutions.com/book-consultation
This blog post accompanies the Certum Solutions video tutorial on uploading & managing receipts in QuickBooks Online, watch here: https://youtu.be/pKTYHKQg0X0?si=G2TZpPn0Io4Y6zpg
About Certum Solutions
Certum Solutions is a leading QuickBooks Solutions Partner & Accounting and Business Systems Consulting firm. Our certified team has helped hundreds of businesses maximize their QuickBooks investments through strategic planning and expert support.
Contact us today for your free initial consultation, we can help with:
Expert business system evaluation
System selection, setup, & configurations
Migration planning and support
Third-party integration assessment
Ongoing optimization, training, & support
QuickBooks Related Services Offered By Certum Solutions
Get up to 50% off* QuickBooks for 3 months ➔ https://quickbooks.intuit.com/partners/affiliates?cid=par_pim_gm9QvQzdFBZx
Learn QuickBooks! QuickBooks Training Services ➔ https://www.certumsolutions.com/quickbooks-training
Intuit Enterprise Suite Migration Steps ➔ https://www.certumsolutions.com/step-by-step-intuit-enterprise-suite-migration
QuickBooks Enterprise Implementation & Consulting ➔ https://www.certumsolutions.com/quickbooks-enterprise-setup-support
QuickBooks Online Implementation & Support ➔ https://www.certumsolutions.com/quickbooks-online-setup-support
QuickBooks Payroll ➔ https://www.certumsolutions.com/quickbooks-payroll-setup-support
Intuit Enterprise Implementation ➔ https://www.certumsolutions.com/intuit-enterprise-suite-setup-support
Intuit Enterprise Suite Consulting ➔ https://www.certumsolutions.com/ies-consulting
QuickBooks Consulting ➔ https://www.certumsolutions.com/quickbooks-consultant-charlotte-nc
QuickBooks Cleanup ➔https://www.certumsolutions.com/quickbooks-cleanup
QuickBooks Implementation ➔https://www.certumsolutions.com/quickbooks-implementation-services
QuickBooks Managed Support ➔https://www.certumsolutions.com/quickbooks-managed-support
Book a free consultation with our team of QuickBooks experts today!